

Recessed faucet aerators are designed to make your faucet look less complicated and stylish. However, they are somewhat difficult to clean or substitute without a specific key to open them. This is a problem that has been complained of much by many homeowners, especially during the maintenance of faucets.
This article will explain to you procedural instructions on how to remove a recessed faucet aerator even when the aerator key is not available. Take time and acquire the right equipment and do it yourself and repair the faucet.
Key Takeaways
- Recessed faucet aerators provide a clean look but can be difficult to remove without the key
- Common household tools can often be used to remove a recessed aerator
- Vinegar or CLR can help loosen stubborn mineral buildup on the aerator
- Protect your sink and counter surfaces before beginning the removal process
- Know when a recessed faucet aerator issue requires a professional plumber
Understanding Recessed Faucet Aerators
Recessed faucet aerators are key to improving your faucet’s performance and saving water. They are small but powerful devices that can change how much water you use every day. They also affect the look of your faucet.
What is a Recessed Faucet Aerator?
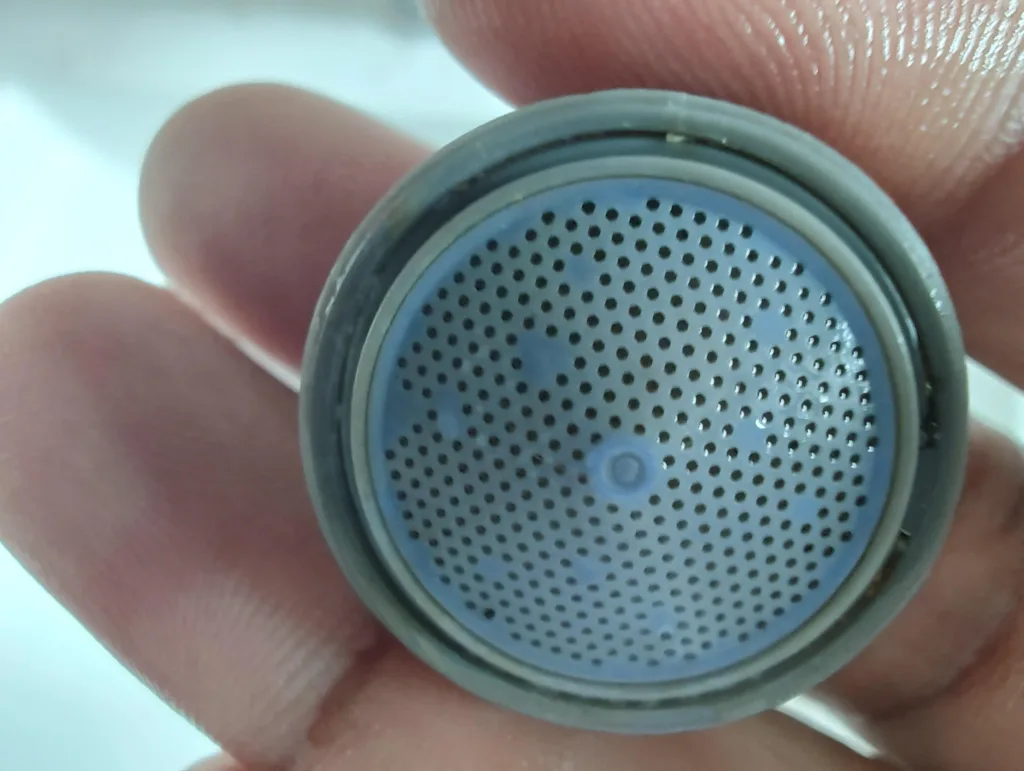
A recessed faucet aerator is a small device that fits into the faucet’s end. It sits flush with the faucet tip. Its main job is to mix air with water, making the flow smooth and even. This helps use less water while keeping the pressure steady.
Unlike traditional aerators, recessed ones don’t stick out. They fit right in with your faucet’s design. This makes your faucet look better and easier to clean. It also stops mineral deposits and grime from building up.
Benefits of Using a Recessed Faucet Aerator
“According to WaterSaving.com, we can save up to 50% in water consumption by using best aerator for our faucets.”
Using a recessed faucet aerator is good for your wallet and the planet. Here are some main benefits:
- Water Conservation: These aerators use less water without losing pressure. This saves a lot of water over time. It cuts down your water bills and helps save this valuable resource.
- Improved Water Pressure: The aeration process keeps the water flow consistent and strong. You get a powerful stream for washing hands, cleaning dishes, or filling containers.
- Enhanced Faucet Design: Recessed aerators make your faucet look sleek and modern. They fit well with many faucet styles, making your bathroom or kitchen look better.
Let’s look at how recessed faucet aerators help with water conservation:
| Faucet Type | Water Flow Rate (Gallons Per Minute) | Water Savings |
|---|---|---|
| Standard Faucet | 2.2 GPM | – |
| Faucet with Recessed Aerator | 1.5 GPM | 32% |
The table shows that a faucet with a recessed aerator uses up to 32% less water than a standard one. This big cut in water usage shows how effective these devices are in saving water.
Knowing about recessed faucet aerators helps you make smart choices when updating or replacing faucets. Choosing this eco-friendly and cost-saving option is good for the planet and makes using your faucets better.
Reasons for Removing a Recessed Faucet Aerator

Keeping up with faucet maintenance is key to making sure your faucet works well and avoids problems like low water pressure. A big part of keeping your faucet in good shape is taking out and cleaning the recessed aerator now and then. Here are some reasons why you might need to remove your recessed faucet aerator:
- Mineral buildup and debris accumulation: Hard water and debris can build up inside the aerator over time, causing clogs and less water flow. Taking out the aerator lets you clean it well and get it working right again.
- Low water pressure: If your faucet’s water pressure drops suddenly, a clogged or dirty aerator could be the reason. By removing and cleaning the aerator, you can often fix low-water pressure problems without needing a professional.
- Uneven spray pattern: The buildup of mineral deposits or debris can make the water spray uneven from your faucet. Taking out and cleaning the aerator can help get the water flowing evenly again.
“Maintaining your faucet aerator is a simple yet effective way to ensure your faucet continues to function at its best. By removing and cleaning the aerator regularly, you can prevent mineral buildup, low water pressure, and other common issues.”

Sometimes, the aerator might be damaged or worn out, needing a new one. Taking out the old aerator is the first step in putting in a new one. Whether you’re cleaning the aerator or replacing it, removing a recessed faucet aerator is easy enough for most homeowners to do with the right tools and methods.
Tools and Materials Needed
Starting a DIY plumbing project like removing a recessed faucet aerator requires the right tools and materials. You might use household items for this task, but some aerators need special tools. Having the right gear makes the job easier and protects your faucet or aerator from damage.
Household Items That Can Be Used
Before buying special tools, check if you have items at home that can help. Here are some common items that work well:
- Pliers: Needle-nose or adjustable pliers give you a strong grip on the aerator, making it easy to twist off.
- Rubber grip: Using a rubber jar opener or gloves improves your grip on the aerator, helping you remove it more easily.
- Strap wrench: A strap wrench is great for removing hard-to-get aerators without damaging the faucet’s finish.
Specialized Tools for Stubborn Aerators
Sometimes, home items aren’t enough for stuck or corroded aerators. That’s when specialized tools are needed. These tools are made just for removing recessed faucet aerators and make the job simpler. Here are some specialized tools to think about:
| Tool | Description |
|---|---|
| Aerator removal tool | A small, affordable tool with teeth or prongs that fit into the aerator’s notches for easy removal. |
| Basin wrench | A long, thin tool with adjustable jaws that reaches into tight spaces behind the sink to turn the aerator. |
| Faucet aerator removal key | Some brands offer a small plastic or metal key just for taking out their aerators. |
Buying a specialized aerator removal tool can save you time and effort, especially with hard-to-remove aerators. These tools are not expensive and can be found at most hardware stores or online.
Having the right tools makes removing the aerator easier and protects the faucet or aerator from damage.
Prepare for your DIY plumbing project by gathering the needed tools and materials. This way, you’ll be ready to efficiently and effectively remove a recessed faucet aerator.
Preparing the Work Area
Before you start to remove a recessed faucet aerator, make sure your work area is ready. Setting up your workspace right makes the removal process smooth and safe. It also helps avoid damage to your faucet, sink, or other surfaces. Follow these easy steps to get your workspace perfect for this plumbing job.
Turning Off the Water Supply
First, turn off the water supply to the faucet. This is crucial for plumbing safety and to avoid leaks or water damage. Find the water shutoff valve under the sink or near the main water line. Turn it clockwise until it stops. After shutting off the water, check the faucet to make sure no water comes out before you start removing the aerator.

Protecting the Sink and Surrounding Surfaces
To keep your sink and nearby surfaces safe during the removal, protect them. Start by putting a soft towel or cloth over the sink. This prevents tools or debris from scratching or damaging it. It’s a simple way to keep your sink looking good.
Also, cover any surfaces near the faucet that could get damaged. This includes countertops, mirrors, or other fixtures. These precautions help reduce the risk of accidental damage. They ensure your work area stays clean and safe during the aerator removal.
“Proper preparation is the key to success when removing a recessed faucet aerator. By turning off the water supply and protecting your sink and surrounding surfaces, you can create a safe and efficient work environment that sets the stage for a successful removal process.”
With your work area set up right, you’re ready to remove the aerator safely. You’ve taken the right steps to protect your bathroom or kitchen fixtures and ensure plumbing safety.
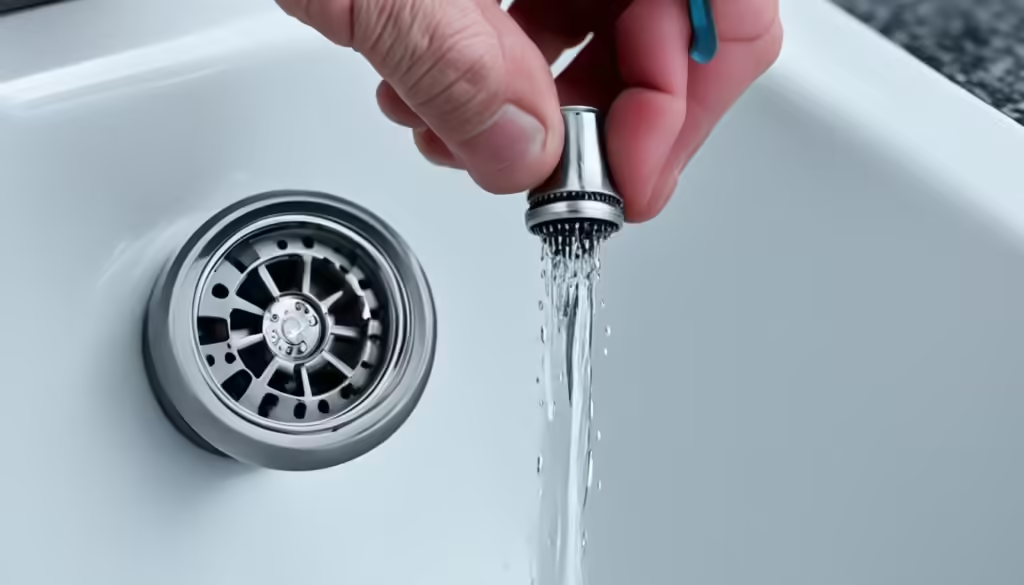
Using Pliers to Remove the Aerator
Removing an aerator is a simple DIY task that can be done with pliers. These tools are found in many homes and help to hold the aerator tightly. You can twist it counterclockwise to remove it from the faucet. This works best if the aerator isn’t too tight or corroded.
- Adjust the pliers to fit securely around the aerator.
- Grasp the aerator firmly with the pliers, ensuring a tight grip.
- Apply steady pressure and twist the pliers counterclockwise to loosen the aerator.
- Continue twisting until the aerator comes loose and can be removed by hand.
When using pliers for this task, be gentle to avoid damage. Too much force can break the aerator or scratch the faucet.
Always be cautious and use the minimum amount of force necessary to remove the aerator. If the aerator doesn’t budge easily, consider alternative removal methods before applying more pressure.
The table below compares the effectiveness of using pliers for aerator removal based on the condition of the aerator:
| Aerator Condition | Effectiveness of Pliers |
|---|---|
| Not overly tight or corroded | High |
| Moderately tight or corroded | Medium |
| Extremely tight or corroded | Low |
In summary, pliers are a good choice for removing aerators in many situations. But, check the aerator’s condition and use gentle force to avoid damage.
Utilizing a Rubber Grip or Strap Wrench
When a recessed faucet aerator is hard to remove with pliers, try using tools like a rubber grip or a strap wrench. These tools give you a strong grip without damaging the faucet’s finish. They apply even pressure and help prevent slipping or scratching the surface.

How to Use a Rubber Grip
A rubber grip is a simple yet powerful tool for loosening aerators. It has a soft, pliable material that fits the aerator’s shape, ensuring a secure grip. Here’s how to use it:
- Put the rubber grip over the aerator, making sure it covers the whole surface.
- Hold the rubber grip with your dominant hand, applying even pressure.
- Twist the rubber grip counterclockwise, using the friction to loosen the aerator slowly.
- Keep turning until you can remove the aerator by hand.
This method is great for aerators stuck due to mineral buildup or corrosion. The rubber’s extra friction helps break the seal without harming the faucet or aerator.
Advantages of Using a Strap Wrench
For very tight or corroded aerators, a strap wrench is a great tool. It has a flexible strap that goes around the aerator and a handle for leverage. Here are its benefits:
- Even pressure distribution: The strap goes around the aerator’s whole circumference, applying force evenly and reducing damage risk.
- Adjustable tension: Most strap wrenches let you adjust the strap’s tightness, fitting aerators of different sizes.
- Non-marring design: The strap is soft and won’t scratch or dent the faucet or aerator.
- Increased leverage: The long handle gives you more leverage, making it easier to loosen tough aerators.
When using a strap wrench, make sure the strap is securely around the aerator and tight. Hold the handle with both hands and apply steady, counterclockwise pressure. The strap wrench’s leverage and even pressure help you remove the aerator safely.
Cleaning Recessed Faucet Aerator with Vinegar or CLR
When a recessed faucet aerator gets stuck because of hard mineral deposits, soaking it in vinegar or using a calcium lime rust remover can help. These methods dissolve the buildup, making it easier to remove the aerator. You won’t need special tools or risk damaging the faucet.
Soaking the Aerator in Vinegar
Vinegar is a great, eco-friendly way to remove mineral deposits from a recessed faucet aerator. Start by taking the aerator off the faucet and putting it in a bowl with white vinegar. Make sure it’s fully covered in vinegar and let it sit for a few hours or even overnight if needed.
Then, take the aerator out of the vinegar and rinse it under running water. Use a soft brush to clean off any leftover deposits. With the deposits gone, try to take the aerator out with pliers or a rubber grip. It should come out easily now.
Using CLR for Tough Mineral Buildup
If mineral buildup is really tough, a calcium lime rust remover (CLR) might be what you need. CLR is made to remove hard water stains and deposits, perfect for a stuck recessed faucet aerator.
To use CLR, mix it as the instructions say. Put the aerator in a bowl with the CLR solution. Let it soak for the time suggested, depending on how bad the buildup is.
Always follow the manufacturer’s guidelines and safety precautions when using CLR or any other cleaning product.
After soaking, rinse the aerator well under water. Clean off any deposits with a soft brush. Then, try to remove the aerator with pliers or a rubber grip.
| Method | Soaking Time | Effectiveness |
|---|---|---|
| Vinegar Soak | Several hours to overnight | Effective for mild to moderate mineral buildup |
| Calcium Lime Rust Remover (CLR) | As per manufacturer’s instructions | Highly effective for stubborn and severe mineral deposits |
Using vinegar or CLR can help you remove a stuck recessed faucet aerator easily. These methods are simple, affordable, and won’t damage your faucet. They can make your faucet work better and look new again.
When to Call a Professional Plumber
Even if you try hard to remove a recessed faucet aerator without a key, sometimes you need a professional plumber. DIY can work well, but some problems need a licensed plumber’s skills for safe and efficient fixing.
Signs That You Need Professional Help
If you’re dealing with leaks from the faucet or aerator after trying to clean it, you might need a pro. Also, if you see damage like cracks in the faucet or aerator, it’s best to call a plumber. Trying different ways to remove the aerator but it won’t budge? It’s smart to get help to avoid more damage.
Benefits of Hiring a Licensed Plumber
For tough faucet aerator removal or plumbing issues, a licensed plumber is a great choice. They have the right skills, tools, and knowledge to fix problems right. They follow safety and building codes, ensuring repairs are done correctly.
By hiring a pro, you avoid water damage and costly repairs later. While DIY might seem appealing, a professional’s expertise is key for your plumbing’s health.